
Tutorial - Cinema4D for generative art?
- Pierre Paslier

- Dec 19, 2019
- 3 min read
Updated: Feb 22, 2020
I often get comments asking in which language I code my generative artwork, and often to the surprise of the person asking, I answer that I don't code. For the most part, I've been using Cinema4D as my sandbox tool to generate the lines that I often then plot with an Axidraw or other pen plotters.

Cinema 4D is a 3D modeling, animation and rendering application developed by MAXON. It is quite a flexible tool, capable of procedural and polygonal/subD modeling, animating, lighting, texturing, rendering, and general 3D stuff.
How to get lines out of C4D?
The magic feature that makes Cinema4D usable for any pen plotter owner is called Sketch & Toon. It's primarily used to render cartoon style videos, but it's very powerful because it allows you to render lines and export them as an Adobe Illustrator file.
1. Set up the render settings
In render settings, you'll need to add "Sketch & Toon" by clicking on "Effects..."

Under the Shading tab, I usually set Object to Background, so that we only see the lines while rendering, not the 3d object.

Now let's add a Sphere in our scene for the purpose of this tutorial.
2. Apply the Sketch Style Tag
Let's select our sphere and click on Tag -> Sketch tags -> Sketch Style.

Now there's a bunch of ways we can tell the tag to render lines. To start with, let's only tick Edges. If you hit render, you should see a fine-meshed sphere on your screen.
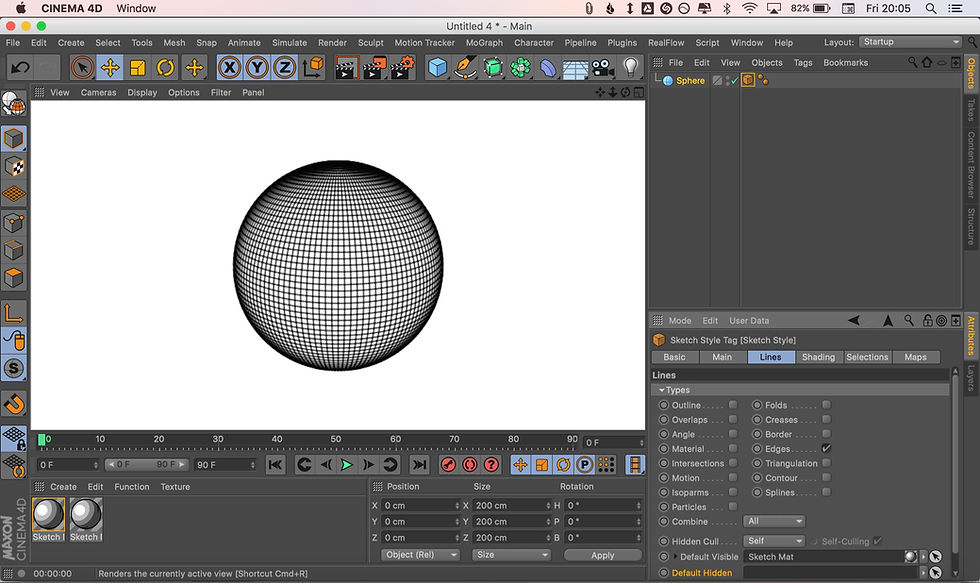
A couple of things worth noting at that stage. You probably noticed how a couple of new materials have been created while we were setting this up. The first one can be deleted, but the second one was automatically added when the tag was applied. This material needs to be assigned to the Default visible box in your Sketch style tag, otherwise C4D doesn't know which material to use.
3. Set up the material
At this stage, things look great on-screen but in reality, Cinema4D is actually rendering each line as a very small segment. Millions of small, disconnected segments. If you were to send this to an Axidraw, your pen plotter would literally raise and lower the pen for each segment. Not what we want. The trick is to use another great function of Cinema4D called Strokes.
Let's open our material, and under the Strokes tab, tick Enable.

Now we've got a bunch of options to help C4D make sense of our disconnected small segments. A good starting point it to set Match to Flat, Join Limit to 100° and untick Filter Strokes. There is a big of black magic at this stage, but I'll cover what you can do to improve things in another tutorial.
4. Experimenting with generative art
Now that we have the main elements correctly setup, it's time to make some generative art. Let's go back to our sketch tag, untick Edges and tick Contour.

Now below you have a bunch of options to change the settings of the contour feature. With Spacing set to Relative and Steps at 50, you should get some interesting line art when you hit Render. Notice how the effect evolves as you rotate the view around the sphere. By playing with the other settings under Contour you can start creating some really cool effects in no time. Add a Torus or a Capsule and start combining shapes and contours...

Welcome to the fun part of experimentation. Time to get creative...
5. Export to .ai
Let's assume you added a couple of other objects, and you're happy with how things are looking. Now let's simply go under File -> Export -> Illustrator (*.ai)
After choosing the name and location of your file, we reach the last Cinema4D step. Under Lines, make sure that Export and Connections are enabled. Hit OK.

6. Plotting with the Axidraw
When it comes to plotting, my workflow isn't super smooth so bear with me. The C4D file you exported is some legacy version of Illustrator that Inkscape doesn't know how to read out of the box. So I usually open the file with Illustrator then re-save it. Then I open it in Inkscape, rescale it to fit the page. I've got an Axidraw V3/A3 (10% discount with coupon GENERATIVE) so make it fit a 420x297mm artwork.

From there it's relatively straight forward, you can watch your plot job happening or jump back into C4D to prepare your next piece.

Voila!
Share your generative art prints with us with hashtag #generativehut
__________________________________________________________________________________
If you like what you're reading, make sure to follow Generative Hut on Instagram for daily inspiration from the wider generative artists community.


Thank you for putting together such a practical and easy-to-follow tutorial. The step-by-step explanations make complex concepts feel much more approachable, especially for those exploring generative art techniques. The way you explained the topic was very clear and helpful. I recently came across a similar discussion related to fake transcripts, and it offered an interesting perspective as well. I especially appreciated the focus on experimentation and creativity throughout the process. This is a valuable resource for both beginners and experienced creators alike.
The platform feels very user friendly because every section is designed with simplicity in mind. Navigation remains smooth, allowing users to find what they need quickly and easily. The layout is clean and well structured, which improves usability and comfort. I like how everything works together to create an enjoyable and stress free experience.
Jai Club Game
For lottery 7, does anyone know if the results are updated automatically or if we need to refresh the page? I’m asking because sometimes these platforms show delayed results, and it becomes confusing for new users.
Every celebration feels more fun with a stylish photo experience that guests love. A magic mirror adds charm, laughter, and instant memories people can take home. With Magic Mirror hire in Central London, parties become lively as guests pose, sign photos, and enjoy interactive features. It suits weddings, birthdays, and corporate nights perfectly. The sleek design fits any venue and keeps everyone engaged. Friendly attendants help guests use it with ease. Make your event stand out and give friends something special to remember long after the music ends happily forever.
These days, having a strong Digital Marketing Service is not optional anymore. Every business needs it to survive. This content explains it well and shows why proper online strategy matters more than ever in today’s competitive market.