
Cinema4D for generative art, part 2
- Pierre Paslier

- May 16, 2020
- 5 min read
Following the good feedback from the first Cinema4D tutorial I wrote a few months ago, here is a breakdown of my workflow for creating a different type of design. In this tutorial, I'll run through the process of generating the pattern using C4D and then plotting it with an Axidraw pen plotter.

Little reminder on Cinema 4D: it is a 3D modeling, animation and rendering application developed by MAXON. It is quite a flexible tool, capable of procedural and polygonal/subD modeling, animating, lighting, texturing, rendering, and general 3D stuff.
How to get lines out of C4D?
As in the previous tuto, I set up my scene to be able to export lines, not pixels. The magic feature that makes this possible in Cinema4D is Sketch & Toon. It's primarily used to render cartoon style videos, but it's very powerful because it allows you to render lines and export them as an Adobe Illustrator file.
1. Artistic direction
My goal for this piece is to use a few generative ingredients I like to blend together:
- I want some elements of the pattern to be perfectly geometric, and retain the precision of the "digital world".
- I want some controlled chaos, using some type of noise to distort the geometry.
- I want repetitive lines that can intersect each other to create some moiré.
- The envelope of the whole pattern should be a geometrically simple shape (circular here)
- I want to be able to adjust some parameters to generate an infinity of similar patterns, and then choose the ones I prefer for plotting...
At this stage, I usually jump in and throw a few things together in C4D till I get what I had in mind, or discover something interesting enough to change my mind.
2. Set up the render settings
In render settings, you'll need to add "Sketch & Toon" by clicking on "Effects..."

Under the Shading tab, I usually set Object to Background, so that we only see the lines while rendering, not the 3d object. In this case, I could set Background color as black as I'll be drawing in white.
3. Set up the cloner
With the pen tool, let's create a simple n-side polygon. If I set the number of sides to 2, I get a line. Let's use the ZX plane for this project. We should also change intermediate points to Natural and set its number to 80.
Now let's add a Mograph Cloner and make the line a child of it. By default, the cloner is in Linear mode but let's change to Radial. I'm cranking the number of clones directly to 120. You should see some sort of Spirograph at this point. Again, use the ZX plane.

Now let's straighten the line. On the transform tab, play with the Z position to get the lines to align to the center (more or less). Then drop X to leave a hollow center. I'm getting there with P.X -300cm and P.Z -50cm... You can also create a camera and use "top" to avoid perspective distortion.

Now let's drop all of these lines into a "Connect" object so that they behave all in unison for the next step.
Let's also bring a Displacer deformer as a child of the Connect object. We're going to use a Noise shader, under the Shading tab, in the Shader drop-down list. Now click on the preview of the noise to edit its properties.

I'm using a cranal noise in this case, with 3 Octaves and a global scale of 550%. Play around with these parameters, that's where it gets fun. If the strength of the effect is too low, get back in the Object tab of the Displace and crank up Strength to 800%.

Now this is some lovely chaos, but let's balance it out by slowly fading its effect as it reaches the external boundaries of our circle. To do this, let's go to the Falloff tab and use a Sphere shape. By default, the shape is quite small so let's increase its scale until it reaches just about the edges of the circle. Play with the Falloff setting to decide how sharp the transition is.
Now we have all the elements in place to render our design with Sketch & Toon.
Let's select our Connect object and click on Tag -> Sketch tags -> Sketch Style.

Last time, we learned about the use of Contour lines. In this case, let's tick Splines. If you hit render, you should see our pattern clear on your screen.

You probably noticed how a new material has been created while we were setting this up. It was automatically added when the tag was applied. This material needs to be assigned to the Default visible box in your Sketch style tag, otherwise, C4D doesn't know which material to use.
4. Set up the material
At this stage, things look great on-screen but in reality, Cinema4D is actually rendering each line as a very small segment. Millions of small, disconnected segments. If you were to send this to an Axidraw, your pen plotter would literally raise and lower the pen for each segment. Not what we want. The trick is to use another great function of Cinema4D called Strokes.
Let's open our material, and under the Strokes tab, tick Enable.

Now we've got a bunch of options to help C4D make sense of our disconnected small segments. A good starting point it to set Match to Flat, Join Limit to 100° and untick Filter Strokes. There is a big of black magic at this stage, but I'll cover what you can do to improve things in another tutorial.
5. Experimenting with generative art
Now that we have the main elements correctly setup, it's time to make some generative art.
Get back to your parameters and experiment to find something that resonates.
Strength

Noise Scale

Clones

Welcome to the fun part of experimentation. Time to get creative...
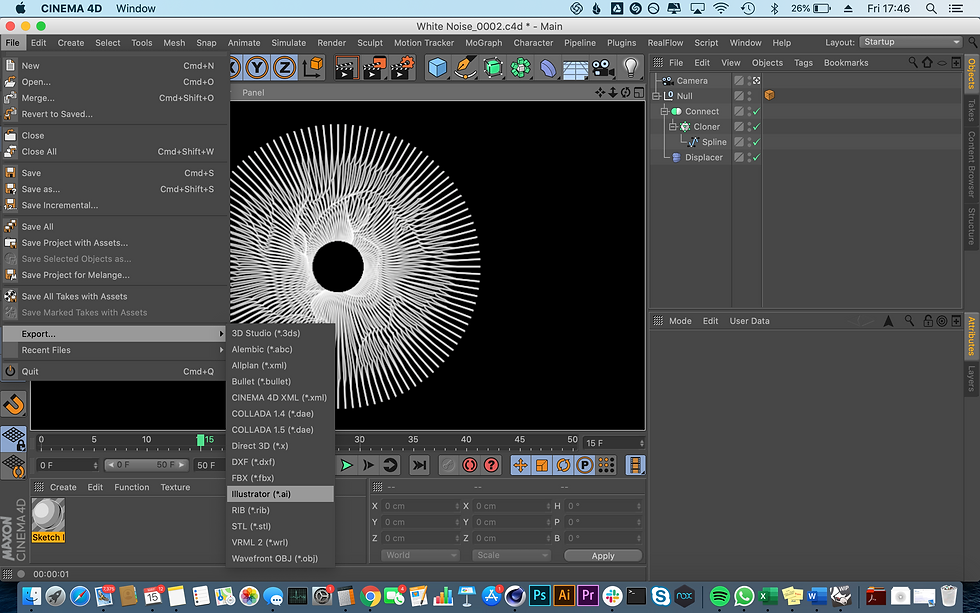
6. Export to .ai
Let's assume you tweaked your parameters, and you're happy with how things are looking. Now let's simply go under File -> Export -> Illustrator (*.ai)
After choosing the name and location of your file, we reach the last Cinema4D step. Under Lines, make sure that Export and Connections are enabled. Hit OK.
7. Plotting with the Axidraw
Now's time to use our pen plotter. The C4D file you exported is some legacy version of Illustrator that Inkscape doesn't know how to read out of the box. So I usually open the file with Illustrator then re-save it. Then I open it in Inkscape, rescale it to fit the page. I've got an Axidraw V3/A3 (10% discount with coupon GENERATIVE) so I make it fit a 420x297mm artwork, or whatever size of paper you plan to use.

When it comes to plotting on dark papers, there are a lot of options out there and it's not easy to find something that works straight out of the box. My new favorite black paper is the Fabriano Black Black, in conjunction with the uni-ball Signo broad white pen. One important point for best results is to make sure there's enough downwards pressure on the paper. I use a tighter rubber band for these plots than usual. This will eventually wear the servo a bit prematurely but that just gives better results.


From there, it's relatively straight forward, you can watch your plot job happening or jump back into C4D to prepare your next piece. Check out the timelapse of the plotter on my Instagram, linked below.
And here's a close-up.

Voila! You're a Cinema4D generative artist. It's not all about Python and Processing ;)
Share your generative art prints with us with the hashtag #generativehut
__________________________________________________________________________________
If you like what you're reading, make sure to follow Generative Hut on Instagram for daily inspiration from the wider generative artists community.


I really enjoyed reading about the balance between geometric precision and controlled chaos in this creative process. The way generative patterns, noise distortion, and moiré effects are combined sounds both technical and artistic at the same time. I think experimenting freely until something unexpected appears is one of the most exciting parts of digital creativity, and that same feeling of discovery is something I also enjoy when exploring and building in EaglerCraft.
I appreciate your willingness to provide this information. Your blog content is exceedingly appealing to me. You have shared a blog post that is both beneficial and captivating to the public. A widely favoured game among several individuals is: monkey mart
It’s fascinating how this blend of technology and creativity is shaping modern expression. Games like Infinite Craft also embrace this concept, allowing players to generate unique worlds through algorithms. This fusion highlights how generative principles transcend traditional art and interactive media, pushing creative boundaries even further.
This Cinema4D tutorial is awesome! It’s amazing how you can go from a simple idea to a complex design using procedural techniques. Kinda reminds me of Bloons TD , but with more lines. Definitely gonna try this for my next generative art project!