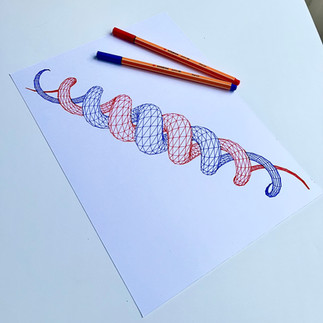
Render 3D scenes from WebGL to SVG
- Mamboleoo

- Feb 19, 2022
- 5 min read
There are many ways to render a 3D scene to an SVG when using a 3D software like Blender. Maybe you even already checked on this website the tutorial by Rebecca Smith on "Exporting an .obj to a pen plotter"?
But as a frontend developer, I'm not really familiar with those softwares and I much prefer coding my 3D animations using JavaScript. For this reason, I have been using the library three.js for a few years now to create generative 3D art.
But very recently I discovered there was a built-in function to render the scene into SVG using the SVGRenderer plugin.
⚠️ In this tutorial I will not go through all the setup of a three.js scene. If you want to learn more about the library, you can start by reading those articles by Rachel Smith or if you want to go deeper, buy the three.js Journey course by Bruno Simon.
Render boxes
The SVG renderer of three.js works exactly like the usual WebGL one. The only difference is that your scene will be converted into paths inside an SVG element and not rendered in a canvas. Note that the SVGRenderer is not included inside the THREE package. You need to load it on top of your code:
import { SVGRenderer } from "https://cdn.skypack.dev/three@0.136.0/examples/jsm/renderers/SVGRenderer.js";In the setup of the renderer, I manually add the xmlns attribute on the SVG element. It is not required to work in a browser, but if you want to copy and paste the code of the SVG to open it later in a software you will need it.
/* Setup the renderer */
const renderer = new SVGRenderer(); // Init a renderer
renderer.overdraw = 0; // Allow three.js to render overlapping lines
renderer.setSize(window.innerWidth, window.innerHeight); // Define its size
document.body.appendChild(renderer.domElement); // Add the SVG in the DOM
renderer.domElement.setAttribute('xmlns' ,'http://www.w3.org/2000/svg'); // Add the xmlns attribute

/* Create 30 boxes */
const geometry = new THREE.BoxGeometry();
for (let i = 0; i < 20; i++) {
  // Create a random color for the material
  const material = new THREE.MeshBasicMaterial({
    color: 0xffffff * Math.random()
  });
  // Create a box
  const box = new THREE.Mesh(geometry, material);
  // Randomize the position, scale & rotation
  box.position.random().subScalar(0.5).multiplyScalar(8);
  box.scale.random().multiplyScalar(2).addScalar(0.1);
  box.rotation.set(Math.random() * Math.PI, Math.random() * Math.PI, Math.random() * Math.PI);

  // Add the box to the scene
  scene.add(box);
}

/* Render the scene */
renderer.render(scene, camera);
If everything worked as expected, you should see boxes of random size and colours on your screen.
To download your SVG you can open the devtools in your browser to inspect the code.
MacOs: Command+Option+I
Window: F12 or Control+Shift+I
From the Elements panel you are able to find the SVG and copy it
(right click on it -> Copy -> Copy outerHTML)
You can then paste that code into a text file, and name it boxes.svg on your computer.
Finally, open that file in Illustrator, and hurrah ✨

Clip hidden faces
If you check the SVG in outline mode, you will notice that the cubes hidden behind others are now visible. Unfortunately three.js doesn't optimize the output for you, and it will render each element in the scene no matter if it isn't visible. Thanks to the Pathfinders tools we can clean that in a single click!

First we need to release all the compound path because three.js is making one path per Mesh even if there are made of multiple lines. Once the paths broken apart, we can use the Trim pathfinder to clean all 'hidden' faces. Finally use the Outline pathfinder to clean all the duplicated lines.
Select all your paths
Go to Object -> Compound path -> Release
Open the Pathfinder panel and click on Trim (Second icon on second row)
In the Pathfinder, click on Outline (Second last icon on second row)
Increase the stroke weight as Illustrator will make them 0 after step 4

Add controls
For now our 3D scene is rendered once, which means we have to define the camera position directly in the code. This is not really convenient as you don't always know from start what is the best angle for your scene. Thanks to the OrbitControls plugin, we can add a drag & drop controller on the page.
// Import the plugin
import { OrbitControls } from "https://cdn.skypack.dev/three@0.136.0/examples/jsm/controls/OrbitControls.js";

// Init the controls to update the camera
// The second parameter is the DOM element used to listen mouse events
const controls = new OrbitControls(camera, renderer.domElement);

// Render the scene on each update of the controls
controls.addEventListener('change', () => {
  renderer.render(scene, camera);
});

// First render of the scene
renderer.render(scene, camera);
You can now drag & drop with your mouse to find the perfect angle you need before exporting your SVG 🎥
Render an .obj model
With what we've learned so far, we can generate a scene with native geometries from three.js. Sometimes we want to load and export a 3D model we made ourself or found online.
Once again, we will take advantage of one of the available plugins. For this demo, I'm using an .obj file, so we are going to use OBJLoader, but if you have another format, you can use any loader available.
Since the materials are different for each model you are loading, you may have to update them a little differently than in the demo.
Watch out that your model could be smaller or bigger than the one in the demo. If you see nothing in your page, make sure that your camera is not inside the model, or too far from it.
import { OBJLoader } from "https://cdn.skypack.dev/three@0.136.0/examples/jsm/loaders/OBJLoader.js";

/* Setup a new loader */
const loader = new OBJLoader();
// Load the OBJ file
loader.load('https://assets.codepen.io/127738/fox_low_poly.obj', (data) => {
  // Convert all materials into a wireframe BasicMaterial
  data.children[0].material[0] = new THREE.MeshBasicMaterial({
    color: 0xff0000,
    wireframe: true
  });
  // Add the model in the scene
  scene.add(data);
  // Render the scene
  renderer.render(scene, camera);
});
Limitations
This solution is far from perfect, here are some issues you may encouter:
Faces are triangles. As far as I know, there is no way to render the side of a cube as a square instead of two triangles. You could use lines to make a cube instead of a 3D volume to avoid the diagonals, but you will only be able to render a wireframe view.
Overlapping geometries. When you have multiply meshes in your scene, the render can show some glitches where a face is wrongly shown on top of another one. Since each mesh is one Path in the SVG, it is very complex to handle a mesh going both over and below another one.
No full support on Inkscape. While I was writing this article, I tried to make it work in Inkscape but I couldn't find a solution for the Trim Pathfinder. Unless I didn't look at the right spot, I don't think Inkscape can help us with the Clipping step.
Plotting
This technique is a good match if you enjoy creating generative art in WebGL and you always wanted to find a way to export them in real life!
If you enjoyed this tutorial please share your best drawings with me either on Twitter (@Mamboleoo) or Instagram (@MamboleooLab) and be sure to use the hashtag #generativehut !


Detailed and practical, this guide explains concrete rebar in a way that feels approachable without oversimplifying. The step by step clarity is especially useful for readers new to the subject. I recently came across a construction related explanation on https://hurenberlin.com that offered a similar level of clarity, and this article fits right in with that quality. Great شيخ روحاني resource. explanation feels practical for everyday rauhane users. I checked recommended tools on https://www.eljnoub.com
s3udy
q8yat
elso9
Using technology to increase access to youth mental health support may offer a practical way for young people to reach guidance, safe-spaces, and early help without feeling overwhelmed by traditional systems. Digital platforms, helplines, and apps could give them a chance to seek support privately, connect with trained listeners-orexplore resources that might ease their emotional load. This gentle shift toward tech-based support may encourage youth to open-up at their own pace, especially when in-person help feels too heavy to approach.
There is always a chance that these tools-quietly make support feel closer than before, creating moments where help appears just a tap-Berlinintim away. Even a small digital interaction might bring a sense of comfort. And somewhere in that space, you…
Starting your own business is exciting, but it’s also full of challenges. From planning your services to reaching customers, every step counts. One thing I’ve learned through trial and error is that a website isn’t just a nice-to-have - it’s a must-have. Are you ready to start your own business? Yes, a website matters. It should be visually appealing and functionally efficient. After trial and error, I came to this conclusion myself. Now, my website https://digitalsuits.uk/services/e-commerce-web-development-company/ is more than a digital business card.
Ready to challenge your spelling skills? scrandle game is a fun game that blends crossword puzzles with word challenges. Use letter tiles to create as many words as you can in limited moves. Discover how many words you can form with Scrandle play online!
Football Bros is an exciting game where you can team up for thrilling matches. Play Football Bros unblocked, master skills with your squad, and dominate the field. Get ready to tackle, pass, and score your way to victory in this action-packed Football Bros play online showdown!